
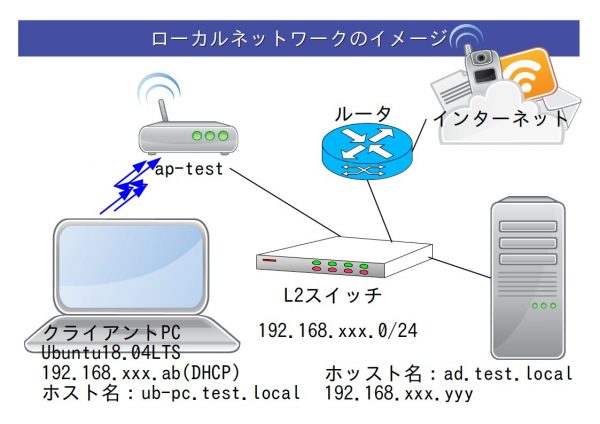
Ubuntu18.04をAD(アクティブディレクトリ)に参加させました。(下図が、今回のネットワークのイメージ。)
-

- 図:ネットワークのイメージ
本来は、「realmd-sssd」で参加したかったのですが、ADDCサーバ(ad.test.local)が動作するsamba4のバージョンの関係で「smbd-Winbind」しか使えませんでした。つまり、「Samba」と「Winbind」を使って、Samba4で動作するADにクライアントPC(Ubuntu)を参加させます。
(もし、エラーが発生したら、表示されたエラーメッセージやdmesg、syslog、journalctl -xeなどを利用してエラーメッセージを確認し、ネットで回避策を検索してください。)
【前提条件】
- ADが適切に設定され動作している(Samba4-CentOS6、internal DNSを利用)。
- クライアントPC(Ubuntu18.04LTS)は、NetworkManagerでwi-fi接続している。
- ローカルネットワーク(192.168.xxx.0/24)にADとUbuntuが接続している。
- IPv6は無効化。
- ①ADDCサーバ:192.168.xxx.yyy
②ADDCサーバ名(サーバのホスト名):ad.test.local
※samba4でADDCを実装。
③domain name(ドメイン名):TEST.LOCAL
④ドメイン名の短縮名:TEST
⑤realm(レルム):TEST.LOCAL
⑥クライアントPCのホスト名:ub-pc.test.local
⑦クライアントPCのIPアドレス:DHCPクライアント(動的に払い出し 192.168.xxx.ab)
⑧アクセスポイントのSSID:ap-test
⑨ADユーザ名:ad-user
⑩クライアントPCのユーザ名(管理者権限あり、設定用):ub-user
ADDCサーバ側の設定変更はありません。したがって、クライアントPC(Ubuntu18.04LTS)の設定のみ記載し、動作確認をします。
(※いつも忘れるのでメモ。ad.test.localのSambaのバージョン確認:/usr/local/samba/sbin/smbd -V)
<手順>クライアントPC上で、ユーザ名ub-userで作業を進めます。
メインの作業は、ADユーザ名(ad-user)でログインできるまでクライアントPCのユーザ名ub-userで作業を進めます。
1.必要なモジュールのインストール。
ub-user@ub-pc:~$ sudo apt install samba krb5-config krb5-user winbind libpam-winbind libnss-winbind
このとき、インストール中に下記のメッセージが表示されます。(環境によっては、表示内容が異なるかも?)
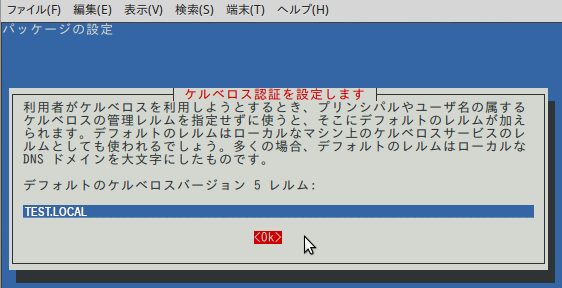
「Configuring Kerberos Authentication」(ケルベロス認証の設定)
(1) Configuring Kerberos Authentication
Kerberosパッケージインストール中に表示されます。
Kerberos Server で使用するrealmを尋ねられているので、
TEST.LOCAL
と入力し「OK」が選択されているのを確認して、「Enterキー」を押下。(もし、「OK」が選択されていなければ「Tabキー」を押して、色を反転させ選択状態にしておく。)
-
- 図1-1:「TEST.LOCAL」と入力。「OK」を選択し、「Enter]を押す。
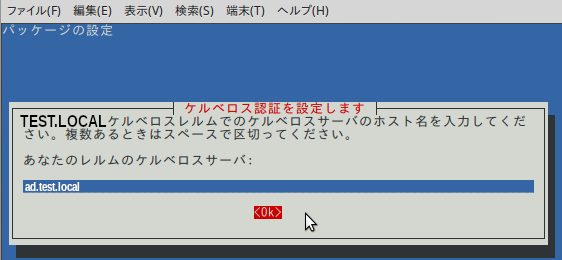
-
- 図1-2:「ad.test.local」と入力。「OK」を選択し、「Enter]を押す。
-
- 図1-3:「ad.test.local」と入力。「OK」を選択し、「Enter]を押す。
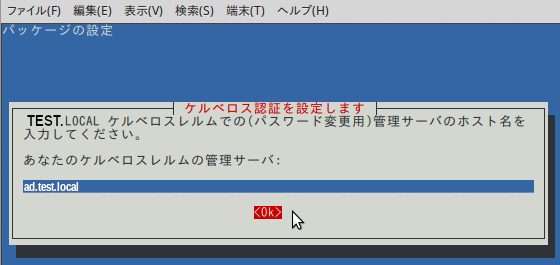
図1-2,1-3は、ADDCサーバ(ad.test.local)を指定しておきます。必要に応じて、変更してください。(表示されないかも)
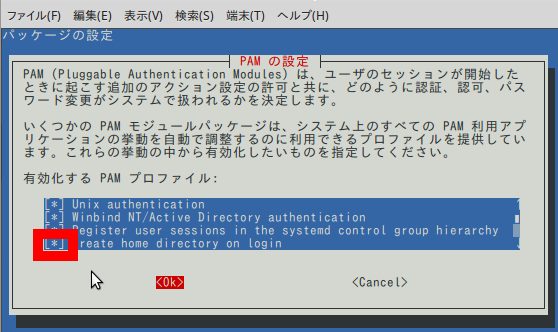
(2) PAM Configuration
pam-auth-update が実行されているようです。
Winbind NT/Active Directory authentication にチェックが入っていることを確認する。必要であれば、「Create home directory on login」にチェックを入れる。(「↓」で、移動し、スペース キーを押せば、チェックされる。)とくに理由がないのであれば、チェックを入れておきます。
「OK」が選択されていることを確認して、「Enterキー」を押下。
-
- 図1-4:「Create」
インストールが完了する。
2.IPv6無効化。
ローカルネットワークは、IPv4で構築されています。
IPv6が有効になっていると、名前解決のときに、最初にIPv6アドレスを取得してしまい、ADDCサーバへJoinできません。ADDCサーバが見つからないのです。
したがて、IPv6を無効化します。
ub-user@ub-pc:~$ sudo vi /etc/sysctl.conf
#以下の行を最終行に追記。
net.ipv6.conf.all.disable_ipv6 = 1
net.ipv6.conf.default.disable_ipv6 = 1
net.ipv6.conf.lo.disable_ipv6 = 1
:wq
上書き保存
ub-user@ub-pc:~$ sudo sysctl -p
を実行すると、設定が有効となり、下記が表示されます。
net.ipv6.conf.all.disable_ipv6 = 1
net.ipv6.conf.default.disable_ipv6 = 1
net.ipv6.conf.lo.disable_ipv6 = 1
念の為に、確認。
ub-user@ub-pc:~$ cat /proc/sys/net/ipv6/conf/all/disable_ipv6
を実行すると、「1」と表示されます。確認完了。
3.nsswitch.confの設定。
リゾルバ用設定ファイルです。(/etc/hostsの新型だそうです。)名前解決する際の、参照先の優先順序を記入しておきます。つまり、名前解決ができるように、hostsのdnsをfilesのあとに移動。
また、Winbind機構はネームサービススイッチ(nss)を経由して、ADDCサーバの認証統合が利用できます。したがって、Winbindの項目も追記しておきます。passwordとgroupでいいようです。
ub-user@ub-pc:~$ sudo vi /etc/nsswitch.conf
# /etc/nsswitch.conf
# # Example configuration of GNU Name Service Switch functionality. # If you have the `glibc-doc-reference' and `info' packages installed, try:
# `info libc "Name Service Switch"' for information about this file.

passwd: compat winbind systemd file  #<==winbindを追記

group: compat winbind systemd file   #<==winbindを追記

shadow: file compat

gshadow: files

hosts: files dns mdns4_minimal [NOTFOUND=return] myhostname     #<==dnsをfilesの後に追記

networks: files

protocols: db files

services: db files

ethers: db files

rpc: db files

netgroup: nis

:wq
nsswitch.conf は再起動しなくてもすぐに反映されます。
4.resolv.confの設定。
ADDCサーバにアクセスするときADDCサーバのホスト名(ad.test.local)が利用できるように、名前解決をします。ここの設定がうまくいかないばあいは、回避策をあとで提示します。(回避策1、回避策2)
resolv.confの設定を変更しても、反映されません。勝手に、書き換えられてしまいます。これは仕様です。したがって、まず、NetworManagerを起動して、必要事項を入力します。
(1) NetworkMangerで設定
今回は、Wi-Fi接続を前提に設定します。(有線LANの場合も、同様に設定しますが、ドメイン名を設定するところは違うと思われます。)
-
- 図3-1:NetworkManagerを起動する。

-
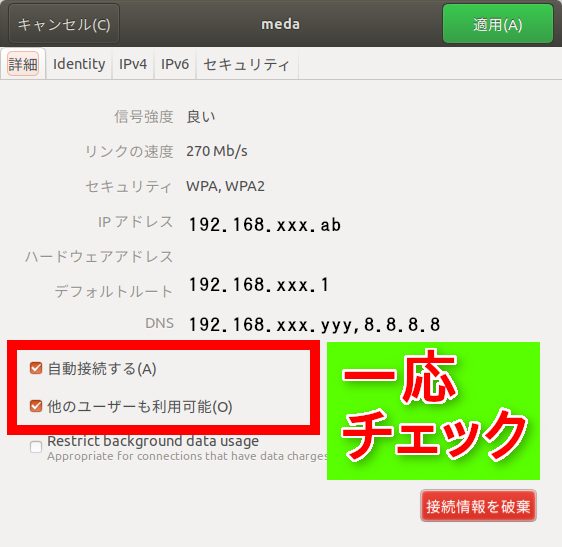
- 図3-2:「自動接続する」「他のユーザも利用可能」にチェックをいれておく。
-
- 図3-3:IPv4の設定。DNS「自動」を「オフ」に切り替える。DNSに「192.168.xxx.yyy,8.8.8.8」と入力。192.168.xxx.yyyはADDCサーバのIPアドレス。

-
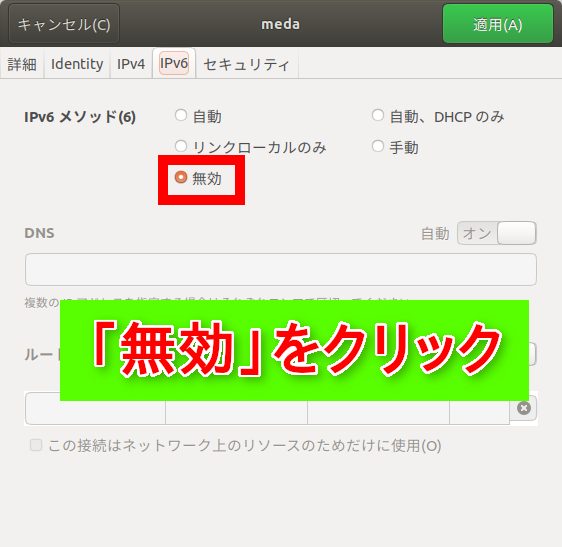
- 図3-4:IPv6設定で、「IPv6メッソド 無効」を選択。
(2) ドメイン名関連の設定
ここで何をしたいか。「search ドメイン名」をresolv.confに追加設定させたい。
では、ドメイン名を設定します。Ubuntu16.04LTSでは、(1)で設定できたのですが、18.04LTSからは設定欄が消えていた。したがって、Ubuntu18.04LTSでは、/etc/NetworkManager/system-connections/ 配下にSSID名(接続名)で、設定値が保存されいるので、それを利用します。(有線では、有線の接続名で保存されている。)
ここでの設定値は、/run/systemd/resolve/resolv.conf に反映されるので、一度、etc配下にあるresolv.confを削除し、かわりに /run/systemd/resolve/resolv.conf からシンボルリンクを配置します。
ub-user@ub-pc:~\$ sudo rm -rf /etc/resolv.conf
ub-user@ub-pc:~\$ sudo ln -s /run/systemd/resolve/resolv.conf /etc/resolv.conf
下準備完了。
次に、/etc/NetworkManager/system-connections/ap-test にドメイン名を設定する。
ub-user@ub-pc:~$ sudo vi /etc/NetworkManager/system-connections/ap-test
===省略
[ipv4]
dns=192.168.xxx.yyy;8.8.8.8;
dns-search=test.local;  #<=ドメイン名を追記
ignore-auto-dns=true
method=auto

:wp
ub-user@ub-pc:~$ sudo reboot #<==再起動
では、「search ドメイン名」 が反映されているか確認。
ub-user@ub-pc:~$ sudo cat /run/systemd/resolve/resolv.conf
# This file is managed by man:systemd-resolved(8). Do not edit.
#
# This is a dynamic resolv.conf file for connecting local clients directly to
# all known uplink DNS servers. This file lists all configured search domains.
#
# Third party programs must not access this file directly, but only through the
# symlink at /etc/resolv.conf. To manage man:resolv.conf(5) in a different way,
# replace this symlink by a static file or a different symlink.
#
# See man:systemd-resolved.service(8) for details about the supported modes of
# operation for /etc/resolv.conf.

nameserver 192.168.130.204
nameserver 8.8.8.8
search test.local
こちらも確認。
ub-user@ub-pc:~$ sudo cat /etc/resolv.conf
# This file is managed by man:systemd-resolved(8). Do not edit.
#
# This is a dynamic resolv.conf file for connecting local clients directly to
# all known uplink DNS servers. This file lists all configured search domains.
#
# Third party programs must not access this file directly, but only through the
# symlink at /etc/resolv.conf. To manage man:resolv.conf(5) in a different way,
# replace this symlink by a static file or a different symlink.
#
# See man:systemd-resolved.service(8) for details about the supported modes of
# operation for /etc/resolv.conf.

nameserver 192.168.130.204
nameserver 8.8.8.8
search test.local
大丈夫です。
NetworkManagerを再起動します。(これは、不要。再起動後なので。)
ub-user@ub-pc:~$ sudo systemctl restart NetworkManager.service
では、動作確認してみます。(名前解決の確認)
端末からpingをADDCサーバのad.test.localに向けて打ちます。
ub-user@ub-pc:~$ ping -c 5 ad.test.local
PING ad.test.local (192.168.xxx.yyy) 56(84) bytes of data.
64 bytes from 192.168.xxx.yyy (192.168.xxx.yyy): icmp_seq=1 ttl=64 time=3.01 ms
64 bytes from 192.168.xxx.yyy (192.168.xxx.yyy): icmp_seq=2 ttl=64 time=3.96 ms
64 bytes from 192.168.xxx.yyy (192.168.xxx.yyy): icmp_seq=3 ttl=64 time=3.06 ms
64 bytes from 192.168.xxx.yyy (192.168.xxx.yyy): icmp_seq=4 ttl=64 time=3.60 ms
64 bytes from 192.168.xxx.yyy (192.168.xxx.yyy): icmp_seq=5 ttl=64 time=3.10 ms

---ad.test.local ping statistics ---
5 packets transmitted, 5 received, 0% packet loss, time 4006ms
rtt min/avg/max/mdev = 3.019/3.352/3.960/0.374 ms
ホスト名(ad.test.local)が、きちんと名前解決できていました。このとき、IPv6が有効であれば、IPv6のアドレスを取得して、応答が返ってきませんでした。つまり、IPv6の名前解決は成功するのですが、実際には使えません。したがってADにJoinできません。
※Linux Mint 18.3では、設定が少し異なります。
/run/systemd/resolve/resolv.conf は存在しないので、/etc/resolv.conf はそのまま利用します。また、nameserverが反映されないので、「/etc/NetworkManager/NetworkManager.conf 」の「dns=dnsmasq」をコメントアウトします。
(4) hosts の設定
自分(クライアントPC)をADに加えてもらうために、ドメイン名(ub-pc.test.local)を設定します。
ub-user@ub-pc:~$ sudo vi /etc/hosts
[sudo] ub-user のパスワード:
127.0.0.1 localhost
127.0.1.1 ub-pc.test.local ub-pc  #<==追記

# The following lines are desirable for IPv6 capable hosts
::1 ip6-localhost ip6-loopback
fe00::0 ip6-localnet
ff00::0 ip6-mcastprefix
ff02::1 ip6-allnodes
ff02::2 ip6-allrouters
再起動しなくても、自動でこの設定は反映されているはずです。
念の為に、
ub-user@ub-pc:~$ hostname -a
ub-pc.test.local
と表示されればOKです。
ADDCサーバの名前解決ができない場合の回避策として、このhostsファイルにADDCサーバのIPアドレスを追記します。追記場所は、127.0.1.1の下でよいでしょう。(3)で名前解決ができていれば不要です。
192.168.xxx.yyy ad.test.local
ちょっとカッコ悪い設定ですが、一応、動作することを目的とするなら、良し、としておきます。
5.smb.confの設定。
Sambを使って、ADに参加させます。
そのために、ldapやwinbind関連の設定をします。設定内容は [global] セクションで行います。
ub-user@ub-pc:~$ sudo vi /etc/samba/smb.conf
#======================= Global Settings =======================

[global]

## AD setting ###
[global]
security = ads
realm =TEST.LOCAL   #<==念の為に、大文字で
# If the system doesn't find the domain controller automatically, you may need the following line
# password server = 10.0.0.1
# note that workgroup is the 'short' domain name
workgroup = TEST  #<==念の為に、大文字で
# winbind separator = +
idmap uid = 10000-20000
idmap gid = 10000-20000
winbind enum users = no   #<==autofsでユーザ・グループ名が正しく取得できなかったのでyesからnoへ。デフォルトはyes。
winbind enum groups = no #<==autofsでユーザ・グループ名が正しく取得できなかったのでyesからnoへ。デフォルトはyes。
template homedir = /home/%U
template shell = /bin/bash
client use spnego = yes
client ntlmv2 auth = yes
encrypt passwords = yes
winbind use default domain = yes
restrict anonymous = 2
kerberos method = secrets and keytab
winbind offline logon = yes

## Browsing/Identification ###

# Change this to the workgroup/NT-domain name your Samba server will part of
# workgroup = WORKGROUP    #<==コメントアウト

:wq
ub-user@ub-pc:~$ sudo systemctl restart smbd.service
smbdが起動済みなら、reloadでもOKです。
6.krb5.confの設定。
Winbindを利用してADの認証情報を利用します。通常、認証には、ケルベロス認証(複数サーバと複数ユーザの認証を一元管理するシステム)が利用されているので、その設定をしておきます。
※注意!ケルベロス認証では認証サーバ(今回はADDCサーバ)とクライアントPCの間での時刻の同期が必須です。おそらく5分以上ずれると認証は失敗します。本来は、クライアントPCのNTPサーバをADDCサーバに設定するのですが、うまくいかなかったので、放置しています。クライアントPCもADDCサーバもネット経由で時刻を取得しています。これで、今まで5分以上時刻がずれたというとこはありません。つまり、運用上問題なしと判断しています。(ただし、クライアントPCがWindows7のときは数回5分以上ずれていたことがあります。それでも、ネット上のタイムサーバと同期させれば、問題は解決しました。)
ub-user@ub-pc:~$ sudo vi /etc/krb5.conf
[libdefaults]
default_realm = TEST.LOCAL
dns_lookup_realm = true
dns_lookup_kdc = true

[realms]
TEST.LOCAL = {
kdc = ad.test.local
admin_server = ad.test.local
}

[domain_realm]
.test.local = TEST.LOCAL
test.local = TEST.LOCAL

:wqもし、ADDCサーバの名前解決に失敗するときは、「kdc = 192.168.xxx.yyy」を追記する。そのとき「kdc = ad.test.local」は、コメントアウトしておきます。つまり、kdcの値に、直接ADDCサーバのIPアドレスを記入。ちょっと、かっこ悪いが、動作すれば良し、とします。
7.pamの設定。
この設定は、クライアンPCへログインするときの認証に関係。
1.(2)で、「pam-auth-update」が実行され、そこで、設定が終わっていれば、特に何もする必要はありません。もし、オプションなど設定を変えたいのであれば、「sudo pam-auth-update」を再度実行して、必要事項にチェック(基本的には、デフォルトのまま)し、「OK」を選択して「Enter」を押しておきます。もしくは、「/etc/pam.d/common-*」等を直接編集します。
念の為に、クライアントPCの設定情報(デフォルトのまま)を表示しておきます。
ub-user@ub-pc:~$  sudo vi /etc/pam.d/common-account
#
# /etc/pam.d/common-account - authorization settings common to all services
#
# This file is included from other service-specific PAM config files,
# and should contain a list of the authorization modules that define
# the central access policy for use on the system.  The default is to
# only deny service to users whose accounts are expired in /etc/shadow.
#
# As of pam 1.0.1-6, this file is managed by pam-auth-update by default.
# To take advantage of this, it is recommended that you configure any
# local modules either before or after the default block, and use
# pam-auth-update to manage selection of other modules.  See
# pam-auth-update(8) for details.
#

# here are the per-package modules (the "Primary" block)
account	[success=2 new_authtok_reqd=done default=ignore]	pam_unix.so
account	[success=1 new_authtok_reqd=done default=ignore]	pam_winbind.so
# here's the fallback if no module succeeds
account	requisite			pam_deny.so
# prime the stack with a positive return value if there isn't one already;
# this avoids us returning an error just because nothing sets a success code
# since the modules above will each just jump around
account	required			pam_permit.so
# and here are more per-package modules (the "Additional" block)
# end of pam-auth-update config

:wp
ub-user@ub-pc:~$ sudo vi /etc/pam.d/common-auth
#
# /etc/pam.d/common-auth - authentication settings common to all services
#
# This file is included from other service-specific PAM config files,
# and should contain a list of the authentication modules that define
# the central authentication scheme for use on the system
# (e.g., /etc/shadow, LDAP, Kerberos, etc.). The default is to use the
# traditional Unix authentication mechanisms.
#
# As of pam 1.0.1-6, this file is managed by pam-auth-update by default.
# To take advantage of this, it is recommended that you configure any
# local modules either before or after the default block, and use
# pam-auth-update to manage selection of other modules. See
# pam-auth-update(8) for details.
# here are the per-package modules (the "Primary" block)
auth [success=2 default=ignore] pam_unix.so nullok_secure
auth [success=1 default=ignore] pam_winbind.so krb5_auth krb5_ccache_type=FILE cached_login try_first_pass
# here's the fallback if no module succeeds
auth requisite pam_deny.so
# prime the stack with a positive return value if there isn't one already;
# this avoids us returning an error just because nothing sets a success code
# since the modules above will each just jump around
auth required pam_permit.so
# and here are more per-package modules (the "Additional" block)
auth optional pam_cap.so
# end of pam-auth-update config
:wpub-user@ub-pc:~$ sudo vi /etc/pam.d/common-password
#
# /etc/pam.d/common-password - password-related modules common to all services
#
# This file is included from other service-specific PAM config files,
# and should contain a list of modules that define the services to be
# used to change user passwords. The default is pam_unix.
# Explanation of pam_unix options:
#
# The "sha512" option enables salted SHA512 passwords. Without this option,
# the default is Unix crypt. Prior releases used the option "md5".
#
# The "obscure" option replaces the old `OBSCURE_CHECKS_ENAB' option in
# login.defs.
#
# See the pam_unix manpage for other options.
# As of pam 1.0.1-6, this file is managed by pam-auth-update by default.
# To take advantage of this, it is recommended that you configure any
# local modules either before or after the default block, and use
# pam-auth-update to manage selection of other modules. See
# pam-auth-update(8) for details.
# here are the per-package modules (the "Primary" block)
password requisite pam_pwquality.so retry=3
password [success=2 default=ignore] pam_unix.so obscure use_authtok try_first_pass sha512
password [success=1 default=ignore] pam_winbind.so use_authtok try_first_pass
# here's the fallback if no module succeeds
password requisite pam_deny.so
# prime the stack with a positive return value if there isn't one already;
# this avoids us returning an error just because nothing sets a success code
# since the modules above will each just jump around
password required pam_permit.so
# and here are more per-package modules (the "Additional" block)
password optional pam_gnome_keyring.so
# end of pam-auth-update config
:wpub-user@ub-pc:~$ sudo vi /etc/pam.d/common-session
#
# /etc/pam.d/common-session - session-related modules common to all services
#
# This file is included from other service-specific PAM config files,
# and should contain a list of modules that define tasks to be performed
# at the start and end of sessions of *any* kind (both interactive and
# non-interactive).
#
# As of pam 1.0.1-6, this file is managed by pam-auth-update by default.
# To take advantage of this, it is recommended that you configure any
# local modules either before or after the default block, and use
# pam-auth-update to manage selection of other modules. See
# pam-auth-update(8) for details.
# here are the per-package modules (the "Primary" block)
session [default=1] pam_permit.so
# here's the fallback if no module succeeds
session requisite pam_deny.so
# prime the stack with a positive return value if there isn't one already;
# this avoids us returning an error just because nothing sets a success code
# since the modules above will each just jump around
session required pam_permit.so
# The pam_umask module will set the umask according to the system default in
# /etc/login.defs and user settings, solving the problem of different
# umask settings with different shells, display managers, remote sessions etc.
# See "man pam_umask".
session optional pam_umask.so
# and here are more per-package modules (the "Additional" block)
session required pam_unix.so
session optional pam_winbind.so
session optional pam_systemd.so
session optional pam_mkhomedir.so
# end of pam-auth-update config
:wqここで、一度、システムを再起動。
8.ADにJOIN。
(1) Kerberos動作確認
チケット作成
ub-user@ub-pc:~$ sudo kinit Administrator
Password for Administrator@TEST.LOCAL:
チケット表示
ub-user@ub-pc:~$ sudo klist
Ticket cache: FILE:/tmp/krb5cc_0
Default principal: Administrator@TEST.LOCAL
Valid starting Expires Service principal
2018-06-21T17:45:46 2018-06-22T03:45:46 krbtgt/TEST.LOCAL@TEST.LOCAL
renew until 2018-06-22T17:45:33
もし、keytabがない場合は、作成。
ub-user@ub-pc:~$ sudo net ads keytab create -U Administrator
ADにジョイン。
ub-user@ub-pc:~$ sudo net ads join -U Administrator
Enter Administrator’s password:
Using short domain name — TEST
Joined ‘UB-PC’ to dns domain ‘test.local’
DNS Update for ub-pc.shigi.local failed: ERROR_DNS_UPDATE_FAILED
DNS update failed: NT_STATUS_UNSUCCESSFUL
「DNS Update for ub-pc.test.local failed: ERROR_DNS_UPDATE_FAILED
DNS update failed: NT_STATUS_UNSUCCESSFUL」DNSのアップデートに失敗しています。
これは、おそらくADDCサーバであるad.test.local(Samba4)がinternal DNS(sambaに実装されたnamed)を利用していることが原因のようです。実際には、ub-pc.test.localは名前解決はできるので、運用に問題もありません。また、Wiresharkで、ub-pcとad.test.localのやり取りを見ても、きちんと名前解決されています。きちんとDNSは利はたらいています。また、同様に、アップデーも行われているようです。(ネットの情報による:https://lists.samba.org/archive/samba/2013-December/177584.html)
9.Winbindサービス起動。
ub-user@ub-pc:~$ sudo systemctl restart winbind.service
ub-user@ub-pc:~$ sudo systemctl status winbind.service
● winbind.service - Samba Winbind Daemon
Loaded: loaded (/lib/systemd/system/winbind.service; enabled; vendor preset:
Active: active (running) since Thu 2018-06-21 15:50:33 JST; 2h 7min ago
Docs: man:winbindd(8)
man:samba(7)
man:smb.conf(5)
Main PID: 1466 (winbindd)
Status: "winbindd: ready to serve connections..."
Tasks: 5 (limit: 4651)
CGroup: /system.slice/winbind.service
├─1466 /usr/sbin/winbindd --foreground --no-process-group
├─1470 /usr/sbin/winbindd --foreground --no-process-group
├─1474 /usr/sbin/winbindd --foreground --no-process-group
├─1475 /usr/sbin/winbindd --foreground --no-process-group
└─1476 /usr/sbin/winbindd --foreground --no-process-group

6月 21 15:50:33 ub-pc systemd[1]: Starting Samba Winbind Daemon...
6月 21 15:50:33 ub-pc systemd[1]: Started Samba Winbind Daemon.
lines 1-18/18 (END)
Winbindの動作確認として、次のコマンドを実行して、情報が取得できるか確認してもよいでしょう。
wbinfo -u
wbinfo -g
getent passwd
getent group
10.ADユーザとしてログイン。
(1) lightdmに変更。
デスクトップマネジャーをgdm3からlightdmに変更します。(gdm3のログイン画面で、再ログインするとフリーズしたり、ログイン名入力欄が表示されないなど挙動が不安定になる。)
「/etc/lightdm/lightdm.conf.d/00-login-user-list.conf」は、存在しません。そのまま vi でタイピングして保存すれば作成されます。
ub-user@ub-pc:~$ sudo apt install lightdm

ub-user@ub-pc:~$ sudo vi /etc/lightdm/lightdm.conf.d/00-login-user-list.conf
[SeatDefaults]
allow-guest=false
greeter-show-manual-login=true

:wq
再起動してad-userで再ログインします。
11.動作確認。
(1) ホームディレクトリができている。
端末から、
ad-user@ub-pc:~$ ls -la

drwxr-xr-x 8 ad-user domain admins 4096 6月 25 22:41 ダウンロード
drwxr-xr-x 2 ad-user domain admins 4096 6月 1 16:54 テンプレート
drwxr-xr-x 2 ad-user domain admins 4096 6月 23 19:06 デスクトップ
drwxr-xr-x 11 ad-user domain admins 4096 6月 21 16:30 ドキュメント
drwxr-xr-x 2 ad-user domain admins 4096 6月 1 16:54 ビデオ
drwxr-xr-x 3 ad-user domain admins 4096 6月 19 20:03 ピクチャ
drwxr-xr-x 2 ad-user domain admins 4096 6月 1 16:54 ミュージック
drwxr-xr-x 2 ad-user domain admins 4096 6月 1 16:54 公開
を実行して、ホームディレクトリのユーザ名とグループ名を確認します。
ユーザ名は、ad-user で、グループ名は、domain admins となっています。このとき、domainとadminsの間に半角の空白が入っているので、設定で指定するときには、「domain\ admins」としておきます。
(2) 端末でbashが使える。
ad-use@ub-pc:~\$ echo \$SHELL
/bin/bash
(3) 端末でsudoが使える。
端末で、ad-userからub-userへユーザを変更してもよいですが、念の為、一度、ログアウトしてub-userで再ログインします。
端末から
ub-user@ub-pc:~$ sudo visudo
# Allow members of group sudo to execute any command
%sudo ALL=(ALL:ALL) ALL

%Domain\ Admins ALL=(ALL) ALL

:wq
一度、ログアウトして、ad-userで再ログイン。
端末から、例えば、
ad-user@ub-pc:~$ sudo apt update
正常に実行できることを確認します。
(4) 管理者権限のアプリでADユーザのパスワードが使える。
あとは、いろいろなアプリが管理者権限(ad-user)で利用できるように、たとえば、synapticなど。
ad-userを必要なグループに追加します。
ad-user@ub-pc:~$ sudo gpasswd -a ad-user adm
ad-user@ub-pc:~$ sudo gpasswd -a ad-user sudo
ad-user@ub-pc:~$ sudo gpasswd -a ad-user dip
ad-user@ub-pc:~$ sudo gpasswd -a ad-user cdrom
ad-user@ub-pc:~$ sudo gpasswd -a ad-user plugdev
ad-user@ub-pc:~$ sudo gpasswd -a ad-user lpadmin
ad-user@ub-pc:~$ sudo gpasswd -a ad-user sambashare
グループへの追加は、必要に応じて実施します。
以上で、作業は完了です。無事に、クライアントPCがアクティブディレクトリに参加できました。


 =志義ゼミナール小郡校(パソコン事業部)=" />